A concrete sealer's ability to increase the slab's water resistance is a major argument in its favour. Although many suppliers say their products will keep your concrete waterproof, there is no way to know for sure that they will.
A corporation making such a promise is probably not being entirely honest with you. In spite of claims to the contrary, no manufacturer can confidently state that their product can totally waterproof your concrete for the duration of its usable life.
Putting aside the overstated claims made by the majority of companies, it becomes possible to begin to understand which concrete sealer offers the greatest protection against water. There are two main types of sealants, and they are topical and penetrating, respectively.
The penetrating sealers will provide the most protection against water and other forms of moisture, while the topical sealers will leave a film on the surface of the concrete. Initially, water might seep in from below, move through the concrete, and eventually lead to bubbles and flaking in the protective layers. These surface sealers give only little defence, making them more akin to raincoats for your concrete.
The best way to increase concrete's resistance to water is to use a penetrating concrete sealer. Using silanes, siloxanes, silane/siloxane, silicones, and silicate/silicates, you may seal off a surface from water and other damaging moisture.
Mold and mildew growth, along with moisture and mustiness, are all issues that can arise in unprotected basements; however, after your concrete has been sealed against water damage, you won't have to worry about them anymore.
The best part is that you won't have to stress over these things at all.
Enhanced water resistance not only protects the concrete's structural integrity, but also helps preserve the material's natural makeup by preventing water from washing away essential minerals.
This mineral content is crucial to the durability and reliability of the product.
If preventing water damage is high on your list of priorities, you should use a penetrating sealer, which offers the strongest defences.
Check this list of Melbourne builder services to help you make an informed decision for your treatment.
How to Waterproof a Concrete House
If your home will have a concrete foundation or bigger sections made of concrete, you should think about waterproofing the concrete itself.
Your home's cosy atmosphere will be maintained in this way.
However, a real concrete house is likely more waterproof than any other popular type of structure, and the only things that should need attention are cracks, joints, or window and door openings.
How to get started with waterproofing, as well as the waterproofing techniques to consider, are covered in greater detail in this article. Is renovating your house something you're considering?
There's no need to keep looking! If you need help with any aspect of building a house, MJS Construction is here to help.
Prepping Your Concrete
Determine if your concrete house needs waterproofing. Building a wall out of core-formed concrete, precast concrete panels, or Insulated Concrete Forms (ICFs) is essentially the same thing.
more watertight than most other construction techniques from the start, meaning it needs less waterproofing work most of the time.
However, it's not uncommon for prefab concrete structures' outer walls to be coated, and not for weatherproofing.
- If you have suspicions that your building may need waterproofing, it's a good idea to see a reliable general contractor for advice. Rather of putting on a big show to waterproof the room, they may just advise applying a liquid membrane or sealing in any cracks or joints.
Prepare the walls for the coating you have selected.To proceed with waterproofing, you will almost certainly need to have solid concrete walls. That's to say that
- Expansion joints and bigger cracks up to 14 inches (0.6 cm) in width should be caulked using high-quality polyurethane caulking.
- Make sure the concrete patch is totally dry before continuing. Filling any gaps more than 14 inches is now possible (0.6 cm).
- If there are any rough or uneven spots on the concrete, you can get rid of them by grinding them down. You need a flat surface for your waterproofing membrane or slurry to stick to, so you prepare it by levelling it.
Thoroughly clean the surface of your concrete before waterproofing.Wash the concrete with water, TSP (trisodium phosphate), and a stiff brush to remove any remaining loose particles, grease, or grime.
Most membranes have a preference for a clean surface when trying to cling to it. If you want to move forwards, wait until everything is dry.
Choosing Your Waterproofing
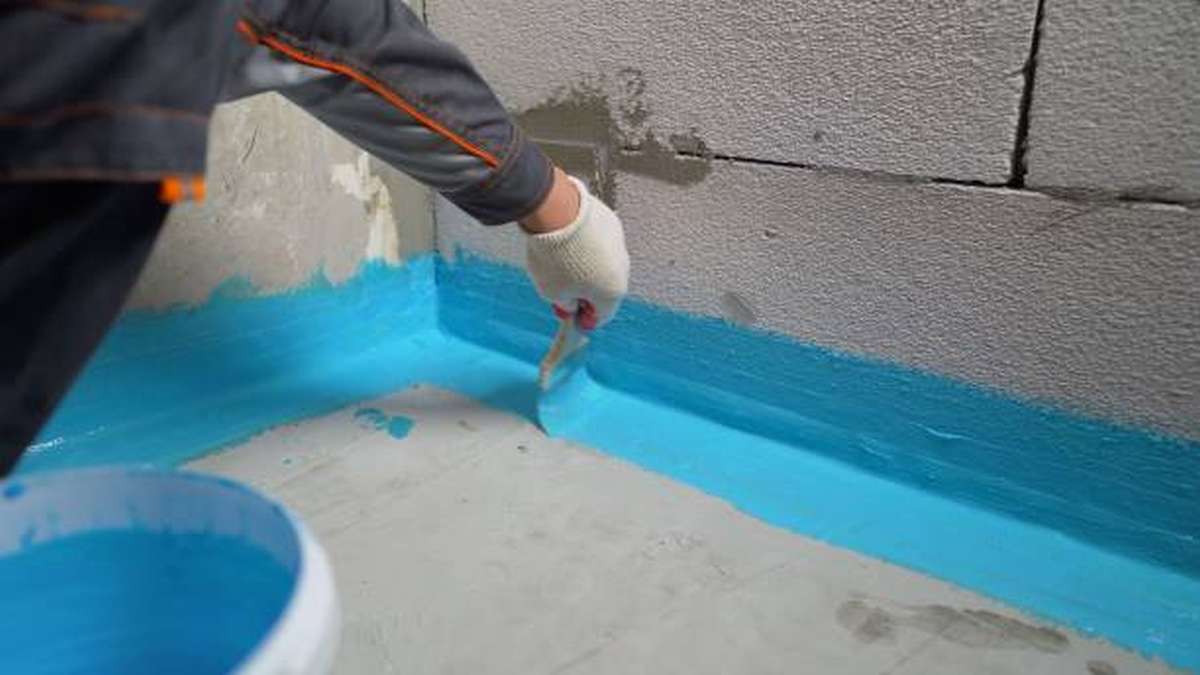
Use a liquid membrane for quickness and economy.Liquid membranes are primarily polymer coverings applied on concrete. You can apply these coatings on concrete by rolling, trowelling, or spraying.
They're cheap and easy to instal in comparison to other possibilities. Always follow the product's usage directions to ensure the best results.
- One major downside of liquid membranes is that they don't provide uniform covering. Despite the fact that the bare minimum recommended thickness is 60 mm. Consistent success in that area is challenging.
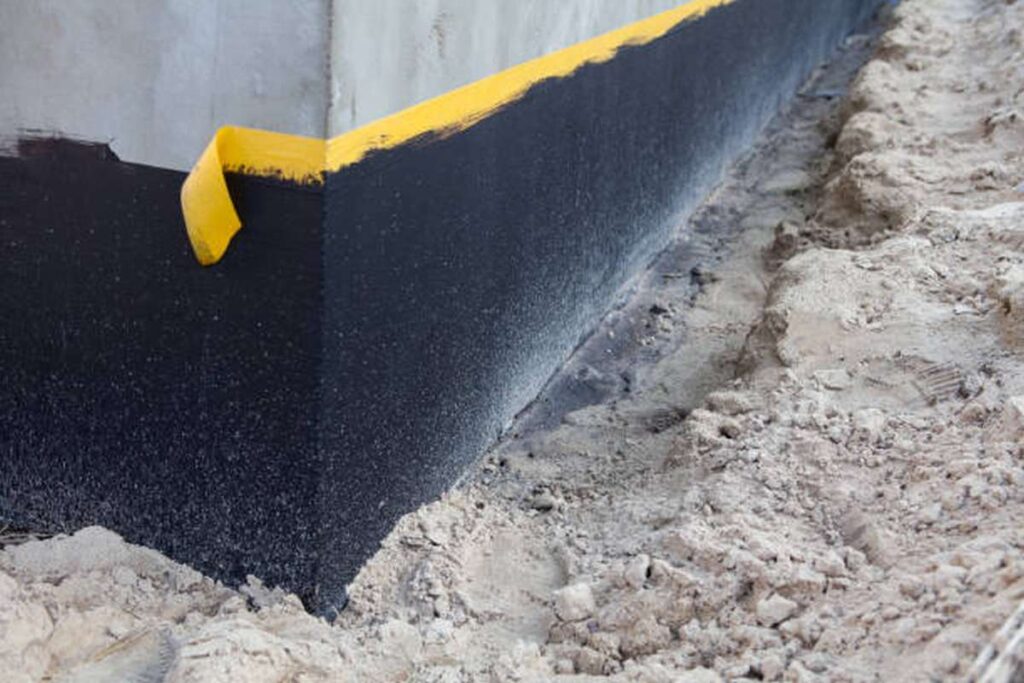
For uniformity's sake, use a self-adhering sheet membrane. Self-adhering sheet membranes are large membranes consisting of rubberized asphalt that are pulled off and laid directly onto the concrete.
Sheet membranes are uniform in thickness, but they can be more expensive to use than liquid membranes in the long run due to the higher cost of the materials and the additional time required to learn how to properly instal and remove them.
- Self-adhering membrane sheets are famously sticky. Peeling the membrane to expose the sticky side is important because the adhesive side will stick to whatever it comes into touch with and will be difficult to remove once it has been set down.
- You need to pay great attention to the overlapping of the sheet membranes to prevent leaks from occuring from sloppy installation. A bead of mastic should be run along each lap joint that is less than a foot from a corner, so take care when cutting them. This will keep the connections secure.
- Sheet membranes demand a minimum of two workers for installation. Doing it yourself during installation is a definite way to end up with a mediocre result and a lot of extra stress.
Experiment with exterior insulated finishing systems, or EIFS. Applying EIFS to the outside of concrete walls results in a covering that is durable, attractive, and easy to maintain. The walls can be insulated and protected from the elements. A finish coat made of EIFS can be put to concrete for a stucco-like appearance. This will provide a watertight surface that is also filled with air and free of any tiny imperfections.
- A trowel is used to apply EIFS, which is provided in pre-mixed, color-of-your-choice, 5-gallon (18.9 L) buckets. Float it off using a Styrofoam block or a rubber float to create a uniform surface and texture. Paint sprayers, paint brushes, and paint rollers can all be used to apply different EIFS products.
The use of cementitious waterproofing should be tried.
While the name "cementitious waterproofing" may be a mouthful, the material itself is easy to prepare and implement.
Find a local masonry supply business to purchase them from. If you mix them with an acrylic additive first, then apply the resulting mixture with a long-handled brush, they will stick to the surface more firmly.
Given its inflexibility, cementitious waterproofing tends to crack over time.
If you're looking for a "green," non-toxic way to waterproof your home, sodium bentonite is the way to go.
Sodium bentonite is used in many landfills to prevent leakage of liquids into the ground below.
This material, which is simply clay, is effective as a waterproofing agent and can be used without leaving a trace if that is a concern.
Bentonite's ability to cover both smooth and more coarsely textured surfaces is an added bonus.
Finishing Up and Other Considerations
It's important to know which walls need to be waterproofed.
They help you save time, money, and stress by figuring out which walls need to be waterproofed and which may be omitted.
By using this rule, you can figure out which walls need to be treated for water resistance: Walls that have soil on one side and a crawl space or other habitable space on the other must be waterproofed.
Additional things to think about are as follows:
- If the space is very damp, you may want to think about waterproofing all of the walls (for example, Seattle or the jungle).
- To ensure that no wall or surface is left unprotected, the waterproofing should extend outward a least of 1 foot (0.3 m) from the wall or surface that requires protection. Leave a little room for mistake to be on the safe side.
Install the chosen wall finish system according the manufacturer's instructions.
Depending on the waterproofing you decide to use, the manufacturer may provide you with different guidelines to follow.
The best outcomes can be achieved by following the manufacturer's guidelines or by consulting a GC.
If your roof is made of cast-in-place concrete, make sure to coat it with the appropriate roofing sealant.
Although it is not common, some houses do use cast-in-place concrete roofing systems. To keep water out of a building, roofs are often coated in roofing cement and covered with fiber-reinforced roll roofing.
- You may be obliged to install a tar or synthetic waterproofing membrane applied directly to the concrete, or a seamless rubber roofing system, if the roof of your home does not have a steep enough slope to allow water to drain off the roof during a rain event. Professionals in the building trade are encouraged to use these items.
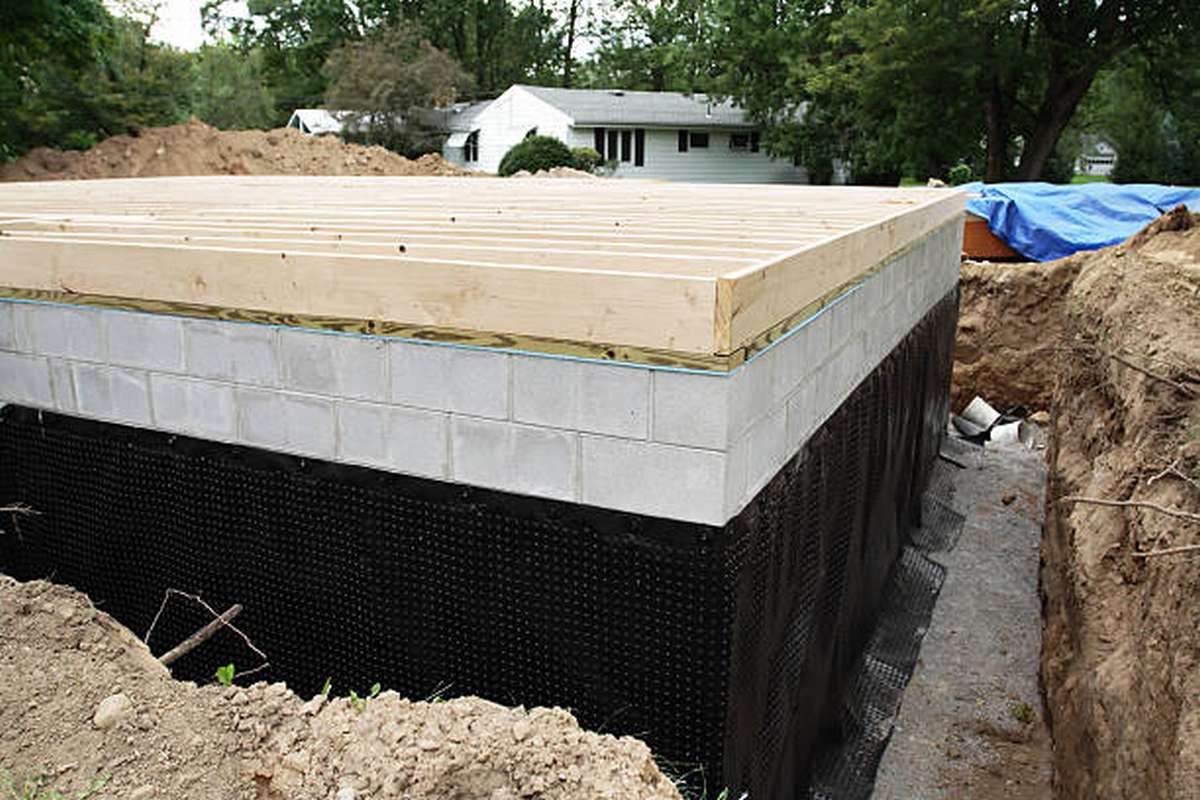
In addition to taking waterproofing precautions, make sure you plan for adequate drainage.
Even though the walls are waterproofed, water will still drip down them if there is nowhere for it to go.
Consult a professional before installing a perimeter footing drain, under-drainpipe system, or sump pump for heavy-duty water relocation.
You'll be trying to drain if the basement is composed of concrete. Choosing the most qualified townhouse builders is a crucial step in the process.
The Right Way to Seal Concrete
Concrete is one of the most popular building materials because it can be used for so many different things, from garage flooring and retaining walls to kitchen countertops and decorative objects, all at a reasonable price and with a high degree of structural integrity.
It's tough and resilient on its own, but it's still smart to give it an extra layer of defence with something like Quikrete's Concrete & Masonry Waterproofing Sealer, a silicone-based surface sealant.
This will preserve the surface's waterproofing and perpetual "just-poured" appearance. All of your hard work on a concrete project will be at greater risk of being destroyed if you neglect to apply this vital finish.
Exterior concrete can crack due to changes in temperature and moisture, while interior concrete can become stained and scratched from regular use.
The good news is that concrete may be protected from these loads with a relatively simple treatment made early on. If you want your concrete to last for years and appear brand new, sealing it is an absolute must.
Serious Surface Coverage
The concrete should cure for at least 30 days before being sealed, regardless of whether it will be used indoors or outdoors.
In this way, the concrete can cure completely before the sealer is put. If you want the greatest results, make sure to keep the concrete surface dry and clean.
There should be no rain in the forecast this week if you plan on doing any maintenance outside on a patio, bench, or sidewalk. (You should also wait until you're positive the temperature won't rise above 90 degrees Fahrenheit.)
Quikrete's Concrete & Masonry Waterproofing Sealer can be applied with a brush, roller, or even a garden sprayer.
The sealant is available in one- and five-gallon canisters and doesn't need to be mixed before application.
Use enough sealant to completely saturate the concrete but not so much that it pools on the surface. Planning to build a home? MJS Construction Group brings your building project alive!
Whether your concrete is porous or smooth, one gallon will cover between 100 and 200 square feet. Of course, this varies from position to position (as, for example, countertop mixes tend to be).
More sealant is needed to completely coat a porous surface.
The sealant and its waterproofing characteristics will be absorbed by the concrete without changing the slab's look.
A second application applied within 10 minutes of the first, before the first has dried, will provide even more defence.
If you apply Concrete & Masonry Waterproofing Sealer in two coats, it will penetrate the concrete's surface and keep water out for good.
These two coats, when applied to exterior surfaces, could delay the need for resealing by as much as ten years.
However, interior applications should not need resealing in the near future because they are not subject to UV rays or temperature variations.
Follow up your treatment with a food-safe wax like carnauba to protect your concrete countertop or tabletop from acidic spills like vinegar, which can cause discolouration.
The surface of the counter or table is being repaired here. To make the sealed concrete acceptable for food preparation, apply this as directed on the container to establish a hygienic barrier between the concrete and your food.
Doing so will unlock the surface's potential for utilisation.
Sealing Expansion Joints
Most outdoor concrete surfaces, like driveways, sidewalks, and patios, have expansion joints cut into them ahead of time. Unlike outdoor work, this is rarely done inside buildings.
Joints allow for imperceptible movement in the concrete at strategic locations, mitigating the effects of temperature changes and ground movement on the structure.
Alternatively, these forces could cause a single lengthy slab to divide at arbitrary locations. Sealing the joints is also important since it reduces the quantity of water that can seep into the concrete. Use a high-quality product, like Quikrete's Polyurethane Self-Leveling Sealant, to perform this before or after you seal the surface.
If the forecast calls for rain, wait until a day when the temperature is between 40 and 85 degrees.
Make sure the joints are dry and clean before applying the sealant: Pebbles and dirt can be swept out of the joints using a brush with stiff bristles, but if oil or grease is present, the residue must be removed from the joints first using a product like Quikrete's Concrete and Asphalt Cleaner.
Quikrete makes Backer Rods, which are compressible foam rods made for sealing joints and cracks.
If the gap between the two pieces of drywall is more than half an inch, you should use these rods to reinforce the joint and leave a gap of about 1/8 inch above the backer rod for the sealant.
Use painter's tape to mask off the area around the expansion joint so that you can focus on filling it in.
This will provide the sharpest, cleanest lines imaginable.
With a caulk gun, fill the crack evenly from one end to the other.
It takes a lot of force to apply the sealant to the joint. Avoid leaving gaps along the edges, but don't apply so much that the sealant rises in a bead over the concrete's surface, either.
The painter's tape needs to be carefully peeled off while the sealer is still wet after it has been applied. Using this method, you can see the straight lines of sealant.
Stop Cracks in Their Tracks
Over time, even if you take the time to properly seal your concrete porch, steps, or slab, cracks will appear. The concrete's expansion joints may have contributed to the craters.
Sealing a crack as soon as possible is preferable since, if left untreated, cracks can become wider and become more challenging to repair.
The sealant used in the restoration must have a strong bond to the concrete and yet be elastic enough to withstand further cracking or separation if the concrete undergoes further movement.
Quikrete's Polyurethane Concrete Crack Sealant may stretch by up to 700% without losing its bonding strength, so it won't sag in the crack even under heavy use.
Its grey hue is also a near approximation to the colour of raw concrete, making the repairs less noticeable. Need to patch up a lot of cracks?
If you want to know how much sealant to buy, you can use this helpful online calculator.
It is crucial to properly prepare the crack before attempting a repair.
To get the best adhesion, you should start with clean, dry concrete on a day with temperatures between 40 and 95 degrees Fahrenheit, and then you should also prepare the crack in the concrete.
- To fix a small crack in concrete, just widen it with a chisel and a hammer until you have a V-shaped opening. About a quarter of an inch is a good width to aim for. Clean out the crack by either brushing away the debris with a strong brush or sucking it out with a shop vacuum.
- If a crack is more than half an inch deep, a compressible foam backer rod should be inserted before sealing it. It is recommended to leave around 1/8 of an inch above the backer rod for the sealant to adhere properly.
The following step involves using a utility knife to slant-cut the end of the sealant tube.
If you do this, you can make a hole that is just right for the gap you need to fill.
To apply sealant to a crack with a caulk gun, load the tube with sealant, then squeeze the trigger with even pressure.
This instructional video from Quikrete will show you how to apply the sealant so that it fills the crack fully, edge to edge, without flowing over the top.
If there is sealant left over on the concrete, you can scrape it off with a tiny trowel.
If you're looking for a high-quality, affordable builder in Melbourne, you're in the right place! Check MJS Construction Group!
The sealant will lose its tacky sensation after being touched for a few hours. If you plan to paint the surface, you'll need to wait at least 72 hours before you can start painting; if you don't, the job is done and your concrete is protected.
Conclusion
Increased water resistance is a primary benefit of using a concrete sealer. Both topical and penetrating sealants are common, yet they serve different purposes.
When it comes to keeping out water and other moisture, penetrating sealers are your best bet. If you have a concrete home and aren't sure if you should waterproof it, MJS Construction can help you make that call.
This article elaborates on how to initiate the process of waterproofing.
Coating the exterior walls of a prefab concrete building can help keep the building dry in wet climates. Large membranes made of rubberized asphalt, known as self-adhering sheet membranes, can be peeled off and put directly over concrete.
Liquid membranes need two people to install and do not give consistent coverage.
Concrete can be given a stucco-like finish with the help of an EIFS finish coat.
Many landfills utilise sodium bentonite to stop liquids from seeping into the soil.
Bentonite has the extra benefit of being able to mask surfaces with varying degrees of roughness. A wall's waterproofing is essential if it has soil on one side and a crawl space or other liveable space on the other.
A tar or synthetic waterproofing layer put directly to the concrete might be required. Before putting up a perimeter footing drain, under-floor drainpipe system, or sump pump, you should talk to an expert.
Whether it will be used indoors or outdoors, concrete needs at least 30 days to cure before being sealed.
You can use a brush, roller, or even a garden sprayer to apply Quikrete's Concrete & Masonry Waterproofing Sealer. Seal the concrete thoroughly, but not so much that it pools on top.
The concrete will absorb the sealant and take on its waterproofing properties without altering its aesthetic.
It is best to seal a fracture as quickly as possible, as cracks can spread and become harder to repair if not addressed.
The sealant chosen must adhere firmly to the concrete without becoming brittle, and it must also be flexible enough to accommodate any future movement in the concrete.
If you have a small break in your concrete, you may easily repair it by making a V-shaped opening with a chisel and hammer.
Caulk guns are used by filling the tube with sealant and then evenly squeezing the trigger to apply the sealant to a crack.
Content Summary
- The best way to increase concrete's resistance to water is to use a penetrating concrete sealer.
- If you need help with any aspect of building a house, MJS Construction is here to help.
- Determine if your concrete house needs waterproofing.
- Prepare the walls for the coating you have selected.
- You need a flat surface for your waterproofing membrane or slurry to stick to, so you prepare it by levelling it.
- Thoroughly clean the surface of your concrete before waterproofing.
- For uniformity's sake, use a self-adhering sheet membrane.
- Self-adhering membrane sheets are famously sticky.
- You need to pay great attention to the overlapping of the sheet membranes to prevent leaks from occuring from sloppy installation.
- Experiment with exterior insulated finishing systems, or EIFS.
- Applying EIFS to the outside of concrete walls results in a covering that is durable, attractive, and easy to maintain.
- The use of cementitious waterproofing should be tried.
- If you're looking for a "green," non-toxic way to waterproof your home, sodium bentonite is the way to go.
- It's important to know which walls need to be waterproofed.
- Install the chosen wall finish system according the manufacturer's instructions.
- In addition to taking waterproofing precautions, make sure you plan for adequate drainage.
- If you want your concrete to last for years and appear brand new, sealing it is an absolute must.
- If you want the greatest results, make sure to keep the concrete surface dry and clean.
- Use enough sealant to completely saturate the concrete but not so much that it pools on the surface.
- More sealant is needed to completely coat a porous surface.
- If you apply Concrete & Masonry Waterproofing Sealer in two coats, it will penetrate the concrete's surface and keep water out for good.
- These two coats, when applied to exterior surfaces, could delay the need for resealing by as much as ten years.
- To make the sealed concrete acceptable for food preparation, apply this as directed on the container to establish a hygienic barrier between the concrete and your food.
- Most outdoor concrete surfaces, like driveways, sidewalks, and patios, have expansion joints cut into them ahead of time.
- If the forecast calls for rain, wait until a day when the temperature is between 40 and 85 degrees.
- Use painter's tape to mask off the area around the expansion joint so that you can focus on filling it in.
- With a caulk gun, fill the crack evenly from one end to the other.
- It takes a lot of force to apply the sealant to the joint.
- The concrete's expansion joints may have contributed to the craters.
- It is crucial to properly prepare the crack before attempting a repair.
- To get the best adhesion, you should start with clean, dry concrete on a day with temperatures between 40 and 95 degrees Fahrenheit, and then you should also prepare the crack in the concrete.
- It is recommended to leave around 1/8 of an inch above the backer rod for the sealant to adhere properly.
- The following step involves using a utility knife to slant-cut the end of the sealant tube.
- To apply sealant to a crack with a caulk gun, load the tube with sealant, then squeeze the trigger with even pressure.
Frequently Asked Questions
The materials for waterproofing in effect should have properties like water-tightness, flexibility, crack-bridging ability, bonding strength, breathability, resistance to UV radiations, microbial attacks, fungus growth, mechanical stresses, insulation characteristics and above all the cost effectiveness.
To prevent water seepage in walls, exterior waterproofing coats are required to be applied on the external walls. A waterproof coat will create a barrier to the rainwater and moisture, and prevent damp walls in your home.
The amount of waterproofing product applied, the local weather, and the degree of damage that was present to begin with are some of the factors that influence how long the protection provided by the waterproofing lasts. There is no set date because there are so many different components, but the majority of professionals will warranty it for approximately ten years.
Seal/coat the interior of the walls with a suitable masonry waterproof product. When the paint dries, the sealant forms a watertight bond to stop water from seeping through. This is how you can waterproof your basement walls from inside.
Some of the old and conventional waterproofing systems are as follows: Brick bat coba system or lime terracing. Bituminous treatment. Metallic sheet wrapping.


